
Thursday, 24 January 2013
Timed Assesment
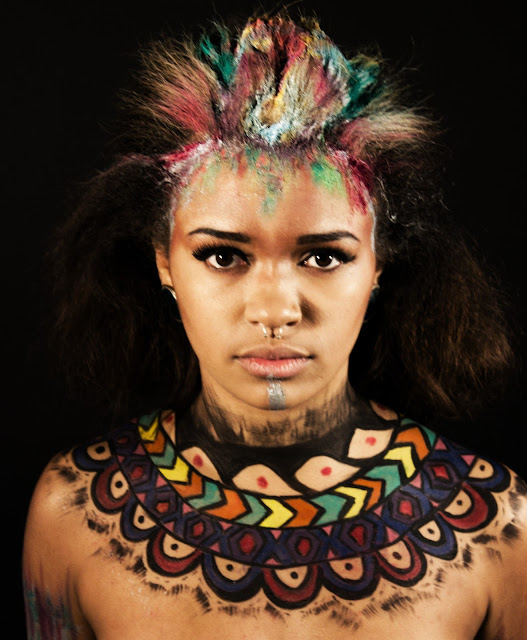
So i have finished my timed assessment creating Minnie's look, the hair was quite hard she is amazing at it, i tried my best and done a few practices, my model cancelled at the last minute but thank fully my friend was able to help, i asked the help of photographer Lauren Hunter. These are the final images.


Face charts
These are the face charts we exchanged during our meetings, not long now till i create her look! nervous!


Buddy meeting
So i met up with Minnie to discuss our timed assessment she is so lovely and her looks are amazing!! i am really excited to try and create her look it does look hard though she is very talented! we swapped design plans and planned out step by step guides so we know exactly what we are doing when we do the assessment.
The step by step guide to create Minnie's look is:
Step 3
Fix with hairspray or fixing spray to stop the smudge and make the arm shinier and bold under the light.
The step by step guide to create Minnie's look is:
Editorial Look - How to
Equipment Needed;
Makeup Accessories
Makeup Accessories
Primer Ear
Cuff
Foundation Long Layered Necklace
Concealer Palette Black/Gold Necklace
Brown Eye shadow Two Belts
Clear Lip gloss/Sealing Gel
White Eyeliner Pencil Hair
Black Collection 2000 Eyeliner Pen
Brown Eyeliner Full White Hair Packet
Bronzer and Highlighter Two Hair Rings
Powder Curby Grips
Mascara Hair Spray
Makeup
Step 1
Create the perfect base using primer, concealer and foundation. Blend into the face and down the neck until it looks natural.
Step 2
Contour the face using bronzer and highlighter on the cheekbones. Contour around the nose using a brown eye shadow.
Step 3
Cover both eyelids in brown eye shadow blending from the contouring on the nose and bring it right up to the hair line as shown on the face chart.
Step 4
Highlight under the brows with white eyeliner, and then bring it down the nose.
Step 5
Use a brown lip liner or brown eye pencil to line the lips then colour in. Go over with a clear lip gloss or Vaseline for a shine.
Step 6
Use black eyeliner to draw the shape of the brows then colour in with collection 2000’s eyeliner pen. Brush the brows upwards so when you make them pointed at the top, you can see the right shape and direction to draw them in.
Hair
Step 1
Brush out all of the models hair, then get the biggest shaped hair ring and place it on the models hair in the correction position you want the hair to be.
Step 1
Brush out all of the models hair, then get the biggest shaped hair ring and place it on the models hair in the correction position you want the hair to be.
Step 2
Use a sectioning comb to separate the hair underneath the ring that will be pinned over the top of it. The rest of the hair above can be clipped on top of the head so it is out of the way.
Step 3
Bring the hair over the hair ring and pin it down until the first ring is covered and all the bottom section of the hair is pinned up. Using the extra hair, wrap this around the hair rings as well to get more of a textured look.
Step 4
Repeat this again with the smaller hair ring wrapping the extra hair with it.
Step 5
After all the hair has been pinned on top of the head and around the hair rings, using the necklace given, pin this to the hair so the beads sit at the front of the head. Secure with clips.
Step 6
Pin in both the belts using hair grips. Get the extra pieces of hair from the packet and create plaits with can be pinned to the front and the sides of the hair for more texture.
Step 7
Using a comb and the hair spray, flatten down any stray hairs around the up do and out of the face.
Body
Step 1
Make sure the skin is clean. Putting toner on the arm with take away and moisture making the eyeliner pen less likely to smudge.
Step 2
You can use mask tape or freehand draw on the bold lines down the arm with the collection 2000 pen. Freehand the more intricate patterns to connect the whole arm together using lines, squares and circles. Look at the final image and my practices.
Step 3
Place the necklace on the model and you are ready to shoot.
Step 3
Fix with hairspray or fixing spray to stop the smudge and make the arm shinier and bold under the light.
Story Board
 |
| Catwalk Story Board For my catwalk look i sourced inspiration not only from tribal on the catwalk but from the indian festival holi and from different african carvings and pattern material, i tried a few different looks until i decided on my finale look. |
 |
| Editorial Story Board For my Editorial look i was very much inspired by the native american tribes as i just found them so facinating and loved how they embraced war/body aint so i knew i wanted to do something with paint on the body i tried it out on my friend and was so happy with it i decided to stick with, with a few tweeks and adjustments. |
Tuesday, 22 January 2013
Finale Mood Boards


AHH BUDDY!
So we have to do our timed assesments soon, so you basically get paired up with someone and you swap desgins and have to create the other persons look, i have been buddied with Minnie Faye Rayment and her work is so amazing i am actually a little scared because the hair is so amazing! and the look i have been given has a full sleeve of designs! which look time consuming! but i am looking forward to it!!
This is the look i have been given by minni, incredible!! i really hope i can do it justice.

This is the look i have been given by minni, incredible!! i really hope i can do it justice.

Fashion Catwalk Photo shoot Images
These are the final images from my Fashion Catwalk photoshoot i used my friend Bianca again because she is so good at it and has such a unique look. I again used Kim Simpson to take the photographs because she knew how i wanted it to look, and i really like the end results.


Subscribe to:
Posts (Atom)